How to set up your Customer Group settings
Before you can start using Customer Groups, you need to set them up in your Invoice Settings.
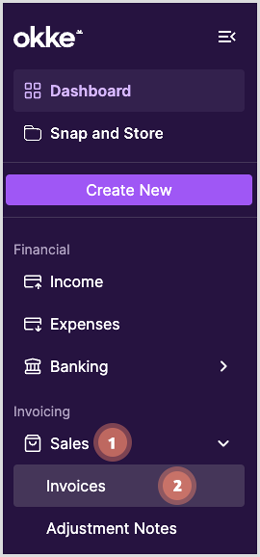
1. Start setting up your Customer Group by clicking Sales > Invoices from the side menu

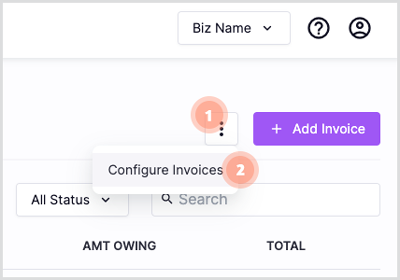
2. Select Options > Configure Invoices from the top right dropdown menu

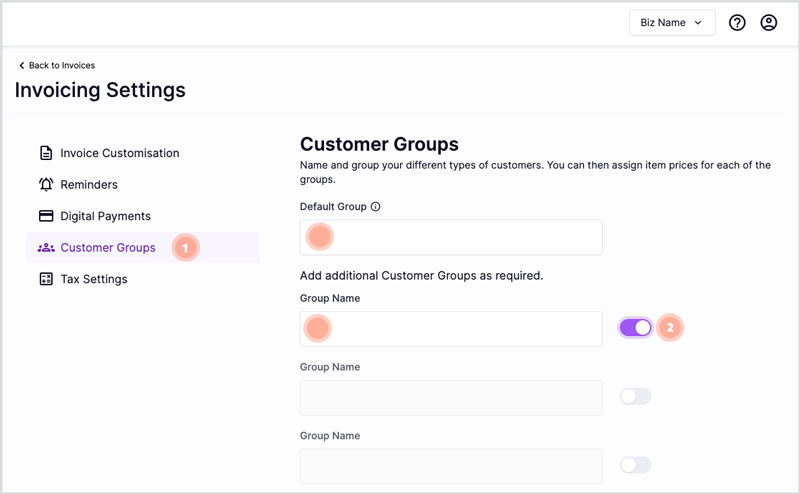
3. Select Customer Groups>Tick the enabled checkbox and give a name to each of the additional Customer Groups you would like to add. For your easy use, there is a default customer group, and you can add up to four customised Customer Groups to group the customers based on how they interact with your business.

Once the Customers Groups are set up, they will appear in:
a. Inventory – Each Inventory Item can now be set up with different prices for each Customer Group
b. Invoice – Each Invoice can now be edited to use a set of Customer Group prices
c. Customer – Each Customer can now be assigned a Customer Group
How to set prices for your Customer Group in Inventory:
- Go to the Item & Services section using the left menu options
- Create a new Inventory Item or select an existing Inventory Item that you wish to set different prices per Customer Group
- Go to Sell Details, select Different pricing for customer groups, check Set a price and add the prices to each Customer Group. Don’t forget to save your changes
How to assign a Customer to a Customer Group:
Once you set up the customer group in customer Group settings (See “How to set up customer group settings”) all the Customer Group will appear in the Customer Group drop-down in each customer record:
When adding a new Customer:
- Navigate to the Customers screen via the left menu under Sales
- Select the Add customer button (See “How to set up a new Customer”)
- Choose the Customer Group via the Customer group drop-down options and save the changes
When editing an existing Customer:
- Navigate to the Customers screen via the left menu under Sales
- Open the Customer you wish to edit, select options then select Edit Details from the drop-down menu
- Choose the Customer Group via the Customer Group drop-down options and save the changes
How to set the Customer Group in an Invoice
Once you set up the special Customer Group prices for your inventory items (see “How to set prices for your Customer Group in Inventory”) you can assign the Customer Group while you’re invoicing. If a Customer Group is already assigned to the Customer (See “How to assign a Customer to a Customer Group), they will automatically be charged Inventory Item prices that are set at Price Per Customer Group on any new Invoices.
When creating a new Invoice:
- Create a new invoice (See “How to create a new invoice”)
- Assign the Invoice to a Customer
- Add an inventory item that has different prices set up for your Customer Group
- The updated prices will be reflected in the invoice as per the Customer Group
 Note: If you want to give a Customer that does not have a Customer Group a once-off price change, you can change the Customer Group within the invoice as per the screenshot below. This change will only apply to the Customer for the specific Invoice that it has been changed on.
When editing an (unfinalised) Invoice:
- Go to Invoices and select an unfinalized invoice that has a Customer without a Customer Group.
- Assign the Customer Group for the chosen Customer as seen below:
