Creating a NDIS Client Customer
What is a NDIS Client?
An NDIS client is a customer type for a customer who is using their NDIS funds to engage with you.Creating a NDIS Client Customer
Create a new Customer by clicking Create New +, selecting Customer, filling in the relevant fields, and saving everything by selecting Add Customer.There are two ways to begin adding a new Customer:
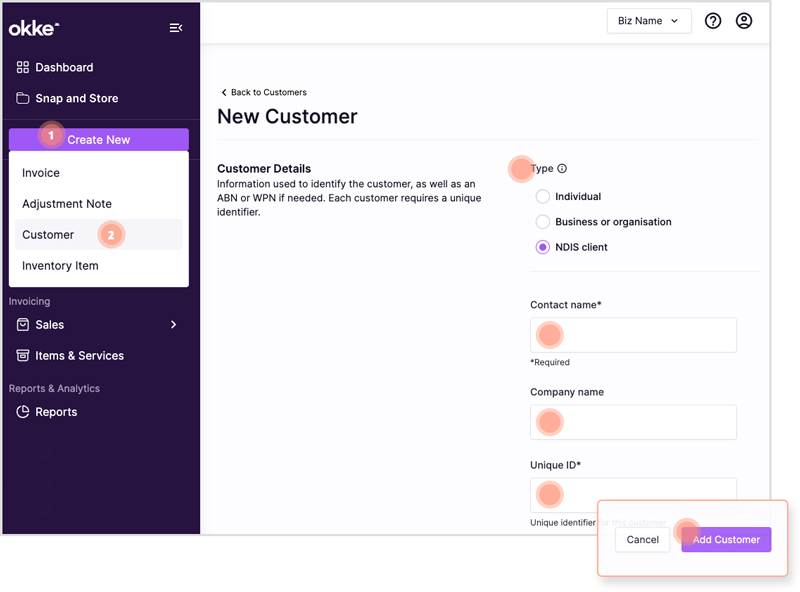
Fill in the relevant fields with your Customer’s details.
- Click on Create New + in the sidebar on the left side of the screen, then select Customer.
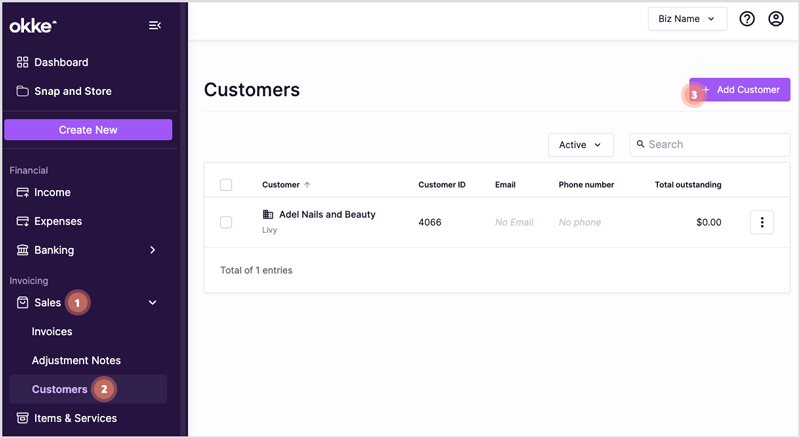
- Or, click on Sales drop-down menu on the left side of the screen. From the dropdown menu, select Customer. Then select + Add Customer in the top right.
Fill in the relevant fields with your Customer’s details.
1. Customer Type: This allows you to select Individual, Businees or organisation, or NDIS client. You want to select NDIS client here.
2. Contact name: This required field is for your clients name.
3. Unique ID: This is a way for the system to find the customer. If you are already using some kind of system to identify your clients, feel free to use that here, or start a new system.
4. NDIS client number: This is where you input the NDIS number for the client, this is important for NDIS claims
5. Email / Website / Mobile: This is where you store the clients preferred contact details. If you have their email, this will be automatically filled in when you go to send them an invoice.
6. NDIS plan manager email: If the client is plan managed, place the NDIS plan managers email in here, this will allow okke to automatically forward invoices to them.
7. Customer group: Using this dropdown menu you can assign the Customer a 'Customer group'. Customer groups are used to set different prices for different Customers (for example, cheaper prices for wholesale customers or friends & family). Read our article on Setting up Customer Groups for more information on Customer Groups.
6. Once you’re done, select Add Customer in the bottom right.
Related Articles
Creating a NDIS Compliant Invoice
Note: Before sending an NDIS compliant invoice, we recommend you add a business logo. An invoice is a standard tax document or agreement for provision of goods & services. There are three stages of an invoice to choose from (top right menu of a new ...Creating a Customer
Create a new Customer by clicking Create New +, selecting Customer, filling in the relevant fields, and saving everything by selecting Add Customer. Video Walkthrough There are two ways to begin adding a new Customer: Click on Create New + in the ...Setting up Customer Groups
What are Customer Groups? Customer Groups can be used to set different prices for different groups of customers (for example, wholesale customers, VIP customers, family and friends) Video Walkthrough How to set up your Customer Group settings Before ...Understanding NDIS Compliant Line Items
Understanding NDIS Compliant Line Items When creating a NDIS compliant invoice, you will need to input line items. okke keeps these line items up to date directly from the NDIS Pricing Arrangements documents. Each line item on a NDIS compliant ...Creating and sending an Invoice
Note: Before sending an invoice, we recommend you add a business logo. An invoice is a standard tax document or agreement for provision of goods & services. There are three stages of an invoice to choose from (top right menu of a new invoice): Send ...